
We strive to make your printing experience stress free!
When you're designing your project you can make it stress free for us too.
WHAT ARE PRINT READY FILES?
When we say “print-ready”, we mean a file that is ready to print as is and has all the specifications needed to produce a high-resolution print product.
Use the checklist below to make sure your file is ready to go.
for PDF Files (recommended file type)
Correctly sized document
Colors set to CYMK instead of RGB
Proper margins (leave important information at 1/4” or at least 3/16” from the trimmed edge)
Proper bleeds (artwork should extend at least 1/8” past crop marks, scroll down for a detailed explanation)
Correctly placed crop marks
Free of spelling and grammar errors

for InDesign Files (for graphic designers)
A properly packaged InDesign file with all the fonts and images used
The InDesign file in .IDML format (file > format > Indesign CS4 or later > save)
WHAT TYPE OF FILES SHOULD I SEND TO PRINTING TRADE COMPANY?
Vector Images for High Quality Printing (recommended file type)
If you draw in a program like Corel Draw or Adobe Illustrator, you're creating a vector image. These vector graphics, can be blown up to billboard size and still be clear and sharp. Vector graphics have nice smooth lines and colors, but lack the shading and color details of a photo. File types include .ai, .eps, .pdf and .dxf. Vector files are the recommended way to send artwork to Printing Trade Company, .pdf files specifically.
Digital Scans or Photos for High Quality Printing
When you scan something or edit a digital photo, you're working with a bitmapped or pixel-based image. It's made up of tiny blocks of color known as pixels. Bitmapped graphics tend to be larger files and they get grainy or fuzzy if you enlarge them very much. File types include .tif, .bmp, .gif, .jpg and .png. Digital scans or photos for high quality printing need to be higher resolution (300 dots per inch for photos).
WHAT COLOR MODE SHOULD MY FILES BE?
You should always start and finish your designs in CMYK color mode. If you send us an RGB file, there is a chance that a color shift may occur and you may not be satisfied with your job.

These colors are in RGB

These colors are the SAME but in CMYK
WHAT IS BLEED?
Bleed refers to a background color, graphic, or image that extends to the edge of the finished paper size and beyond. It's difficult for printing equipment to apply ink up to the cut edge of a sheet of paper. So an extra 1/8” (.125”) bleed area is typically added on each side of the design, enabling the background color, graphic, or image to extend past (i.e., "bleed off") the paper's final trim edge. This extra bleed area will be cut off the printed sheet. For example, a letterhead sheet that incorporates bleed in its design will be 8.75" x 11.25" before being trimmed to a finished size of 8.5" x 11".
Artwork with both bleed and no bleed needs a safety margin of a 1/4 inch (.25”) away from the trimmed edge of the paper on all four sides to avoid information from being cut off. Nothing is printed to the finished edge of the paper.

Bleed vs. No Bleed
The illustration on the left shows a page printed with bleed, before trimming. When trimmed, the finished piece will have color or graphic content extending to the finished, cut edge on all four sides. The illustration on the right shows a page designed without any bleed. When trimmed, the finished piece will have an unprinted border on all four sides.
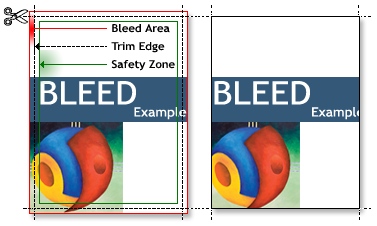
Green Line Safety Zone
To avoid being trimmed off, text and other important matter must stay within a "safety zone" that is is a minimum of 1/4” (.25”) away from the trim edge. Any design elements that extend beyond the safety zone risk being cut off in the process of trimming the paper to its finished size. For example, the safety zone for an 8.5" x 11" letterhead would be 1/4” (.25") smaller on each side, or 8" x 10.5".
HOW DO I SET UP A TRI-FOLD BROCHURE?
When designing a tri-fold brochure it’s easy to assume that each panel is the same size but in reality one panel is 1/16” smaller than the other panels. Outside panels: 3-11/16 Inside Panel: 3-5/8. Please note that the smaller panel is on the left side for the outside of the brochure and on the right for the inside of the brochure. It is also Ideal to keep copy within the margins so important information doesn’t get lost in the folds or cut off when the paper is trimmed.


TIPS FOR KEEPING YOUR PRINTING COSTS DOWN
Contact us early in the planning process
Price is impacted by turnaround time and business volume. A fast turn around time during busy times cost more!
Consider using discounted or overstocked paper
If paper type isn’t an issue ask us how we can save you more money and we will happily find the right paper to suit your needs.
Go for Black Ink Only
If you don’t need colored printing consider printing your documents in black ink. Color may make graphs and charts look more exciting, in many cases, but the information will still be clear in black and white.
Use color paper
To avoid color printing use black ink with bright color paper